
The problem exists only when you use Windows Live ID as your authentication mechanism for SharePoint authentication. If you click the Windows LiveID Icon for authentication nothing happens and you are reverted to the default SignIn page for SharePoint 2013.
If you check the Event Viewer Application Log you will see the following error:
![]()
The description doesn’t say much except that the trusted login provider (in this case it is the Azure ACS service) has supplied a token that was not accepted by the SharePoint Server:![]()
When you setup your SharePoint environment you will most probably use the emailaddress for validation. However the Windows Live ID by default uses the nameidentifier as type for validation.
You will have to login to your Azure ACS dashboard and connect the nameidentifier type to the emailaddress type.
1. Go to your Azure ACS URL (https://servicenamespace.accesscontrol.windows.net/v2/mgmt/web)
2. Click on the Rule Groups on your right
3. Click the Rule group that is used by your SharePoint environment
4. If you clicked the generate button and Azure ACS generated the rules for your environment you will probably have one entry for the Windows Live ID as Claim Issuer
![]()
5. Scroll down to the Then section and change the claim type to: (http://schemas.xmlsoap.org/ws/2005/05/identity/claims/emailaddress)
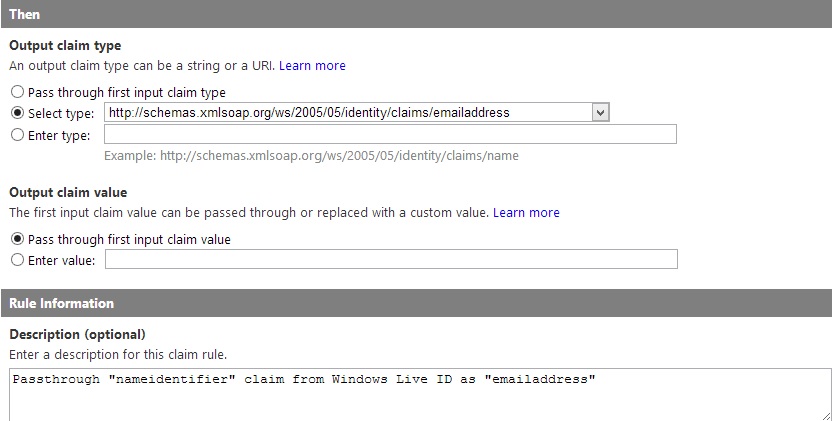
6. Change the nameidentifier part in the Description field to “emailaddress”
7. Save the changes
You can try to sign in to your web application now using the Windows Live ID option as an authentication provider. The problem that still remains for Microsoft to solve is the way the username is shown when someone logs in using the Windows Live ID option. If you don’t want to share your webpage with every single user that has Windows Live ID than you will probably want to add some users manually to your web application. Every time you’ll want to add a user you will have to get the whole string (which you can obtain when you try to send a request for webpage access) and add the string as a user with read/modify/full control permissions on your web application.
![]()